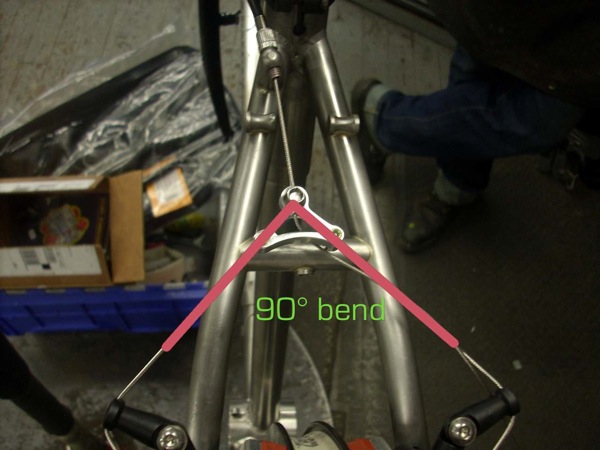
- To adjust the spring tension on the brake arms:
- A little goes a long way. You don't need large adjustments
- Think of the tension cap as a clock face: When adjusted properly the spring tab on the tension cap should be between 11 and 1
- Use a 16mm wrench on the adjuster and hold the brake fixing bolt steady with a 5mm allen wrench.
- To increase the tension, turn the cap away from the wheel.
- The best stopping occurs when the brakes feel nice and solid at the lever.
- A 90 degree angle when the brake is pulled gives the best combination of stopping power and feeling of firmness.

- You can change the way braking feels by moving the straddle saddle up (firmer) or down (softer)
- You can also change the angle of the adjustable portion of the arm in (firmer) or out (softer).
- We've found that there is no need to set the brakes up a little "squishy" (i.e. using more mechanical advantage) in order to get maximum braking power.
- A 90 degree angle when the brake is pulled gives the best combination of stopping power and feeling of firmness.
- The adjustable arms are used to get the correct angle on the straddle cable as well as the feel correct.
- The standard range of cantilever post width is 75mm to 85mm.
- The narrower the posts are, the more upright the adjustable portion will be
- The wider they are the wider the adjustable portion will be set.
- If you are using a cartridge style brake pad (such as the Matthauser pads that the brake ships with) make sure to set up the brake pads according to the directional arrows on the pads, otherwise the braking force can push the pad out of the holder.
- If you are using a solid block pad (such as a Kool Stop Eagle Claw) the rear ones can be turned "backwards" (i.e. so that the long part of the pad faces forward) for better power.
- The brake pad should be set as close to the arm as possible with a minimum amount of post showing.
Quick Release for wheel removal
Almost all brake designs have some form of quick release mechanism to make it easier to remove your wheels. The Big Squeeze has a design as well and it's very simple. When you want to remove your wheel, simply use one hand to squeeze the brake pads together and the other hand to pull the cable off to the side. Just reverse the procedure to hook them back up. (See video clip below)Important note: On every bicycle with any type of brake, the rider should always test the brakes before taking off on a ride.
Here's a video clip that shows the procedure.
Big Squeeze Cantilever brakes - How to use the quick release for easy wheel removal and re-installation from Rodriguez Bicycles on Vimeo.
Need more information? Contact us!
- Phone: (206)527-0360
- Come to the shop!
5627 University Way NE
Seattle, WA 98105

